
 Editing photos in Photoshop is one tricky job not everyone can do. Multi-clipping path, also known as a multi-layer clipping path, involves creating two or more clipping layers in a singular image. It is the most efficient way to clip an image while also being able to edit different parts of it at the same time.
When images have more than one product, you’ll need multi-clipping paths to adjust the color in specific areas. It is a lengthy process that necessitates a lot of effort and time for you if you do not hire a professional. The best way to use multi-clipping techniques is to hire a professional multi-clipping path company. It's less time-consuming and saves up a lot of money in the long run. What is the multi-clipping path? Multi-layer clipping path requires multiple layers in a single image to isolate different elements of a product in the image. It can also be used to edit each part of the image separately. It creates a more professional appearance for the product. The importance of multi-layer clipping path Multi-clipping path service is useful for retouchers and it has a significant impact on many ecommerce business strategies. It allows you to isolate the different elements of an image in the same background. It enables more control over your image editing. Color correction, adjustment of the product photo, spot removal, and other techniques are used by graphic designers to make images more appealing. This means if you have product images that you want to upload on your ecommerce website, chances are that you can increase your sales by showing highly edited images that look beautiful and can convey to customers. When to use multi-clipping path service?
0 Comments
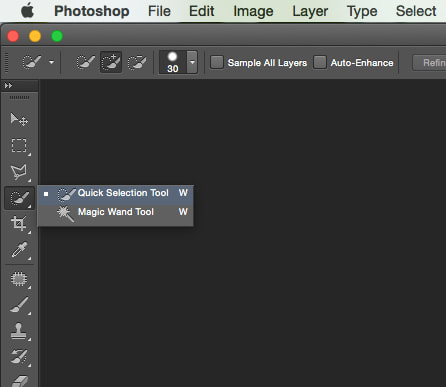
 There are multiple ways to remove photo backgrounds in general. Adobe Photoshop is the most common method used in removing the background. It has become the business standard for photographers and graphic designers. The software has come a long way since its predecessors and truly hits the mark. Without wasting any more time here is how to remove background in photoshop- Before we even begin, we need to ask ourselves does the subject stand apart from the background? If the subject's background is a tree and the subject is wearing a similar color, then clipping the subject out can be pretty difficult. Are there “intricacies” at the edge of your subject or image? If the subject has stray hair or is translucent like water, it could be pretty difficult to remove the subject from the background. Remember that we want to remove the background without damaging the subject.
 4. Background Eraser Tool- It is a tool that worked by taking an example of tone at the focus point of the brush and choosing something similar or comparable hued pixels as you move the anchor point from one point to another.For eliminating the foundation open your picture in Photoshop first. Find and select the Background Eraser Tool in the Photoshop Toolbox. It might be concealed inside the Eraser submenu, so snap and hold that or press E to include it.Guarantee the brush is the right size. You can use the [ and ] segment keys or change them in the menu bar. A greater brush is quicker anyway you really want precision in the event that you are working in confined spaces. You can and ought to zoom in, as well. You want the brush to be by and large very unforgiving with the slider, too. Assuming you have fleecy edges, you will abandon knick-knacks. Shift [ and ] will reduce or extend hardness. Put down specific limits on the menu to Find Edges. Spot the point of convergence of your brush over the concealing you really want to dispose of and click. You will discard any coordination with tone inside your flexibility and abandon various tones. Obstruction is the means by which wide the segment of concealing is that the circle will wipe out. On the off chance that you intended to wipe out this grass from behind the legs, you would require a high versatility since there are yellowish stalks and stained leaves. On the off chance that someone was wearing green leggings, you might be in a predicament. Begin with it set to 25 and see how you go. 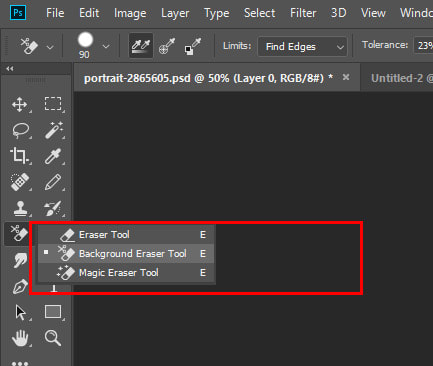 5.Pen Tool- The pen Tool or pen apparatus is the furthest from AI decision for eliminating the foundation you can get without going freehand. (Freehand is, clearly, an elective you can use in the Layers board and Mask-especially on the off chance that cushioned edges are OK, similar to a light sea against a light sky.)In any event, Pen Tool grants you to begin painting around space using a blend of a straight and bent line. You can flip between the two by mousing over a center point and pressing the Control/CTRL key. Since the instrument is so normal, it's undeniably challenging to portray how to use it in words! The best thing to do is to watch this video by Phlearn and a while later feel your direction into using it. It's very fun. You want to utilize the Pen Tool to eliminate the foundation. The device attempts to make a Path (on the extreme left in the layers board) and subsequently clicks cmd/Ctrl+click to change it into a decision. On the off chance that you are working sincerely, you ought to fabricate the cushioning of edges a smidgen on the grounds that hard edges can look unnatural, especially against a splendid establishment.   What is Ecommerce Image Editing?
Ecommerce Image Editing is the largest photo editing service for online businesses, photography studios, advertising agencies, and graphic designers in general. It is the service of retouching product photos and optimizing them for mass upload on websites. Benefits of Ecommerce Image Editing-
Who needs Ecommerce Image Editing Service? Ecommerce Image Editing Service is commonly used by E-commerce Website owners, photographers, designers, retailers, and more. Produced by CPH Graphics Media  Videos have become the norm now when it comes to marketing for any company. Even social media giants like Facebook, Youtube, Instagram, and Twitter now encourage users to upload more videos to gain more reach on their profiles. With that being said here are 10 benefits of video marketing-
Check Out Clipping Path Service Providers for any Photo Editing needs for your business. 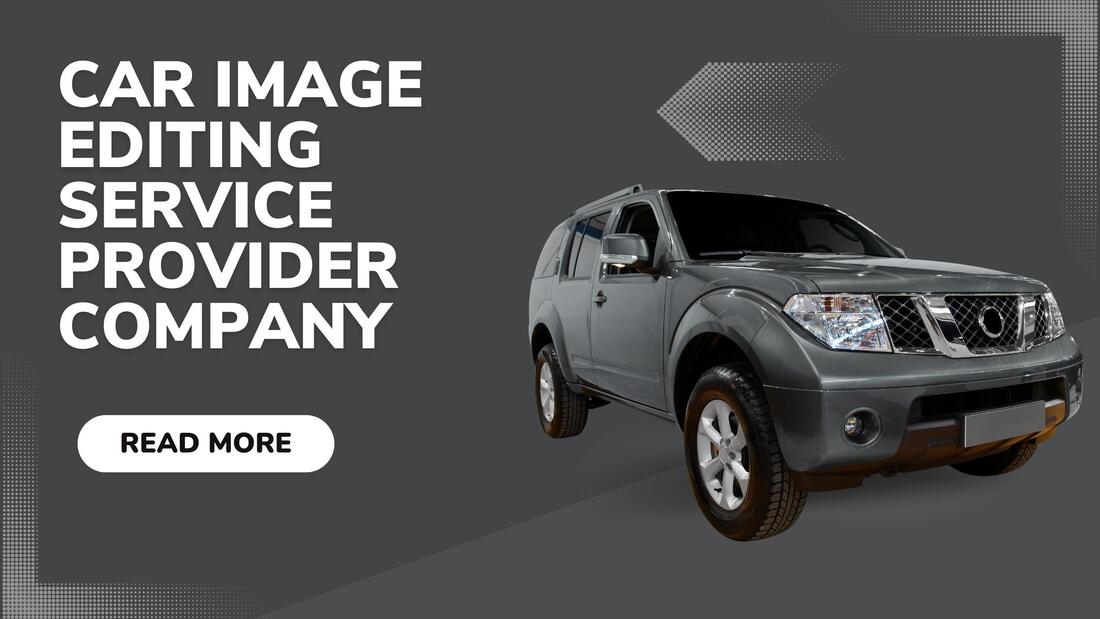 What is car image editing?
It is ordinarily named vehicle pic altering. A couple of essential things are compulsory during auto photography. The vast majority of them are probably going to require a delicate final detail on the vehicle body, glasses, body units, and tires. It is additionally fundamental for eliminating the residue, cleaning the spots, changing shadow impact, and mirror reflection. Incredible Photos Give Your Business The Competitive Edge At the point when your vehicle photographs stick out, then, at that point, you're now a stride in front of your rivals. As expressed, no one needs a conventional picture, particularly the people who are searching for something to purchase. Photographs that went through proficient altering look staggering and proficient, making clients search for more. Furthermore, when they're intrigued with what they see, odds are they will reach you to ask about the vehicle. Photograph Editing Makes Your Vehicles Easier To Sell Vehicles are quite difficult to sell. Furthermore, when you do it on the web, the test turns out to be more troublesome because the outreach group isn't around to make sense of it. Photograph altering will make your vehicles more striking than any time in recent memory through the assistance of a variety of amending and lighting impacts. Along these lines, regardless of whether the purchasers see the vehicles face to face, they will have a more improved thought of how the vehicles would look once they bought them. Notwithstanding, there are rules to keep when altering pictures, which will be examined later on. A Better Chance To Show Your Great Service Better symbolism gives you the lift you want to stand out for general society. However, remember that great pictures can go quite far. You can have the most attractive vehicle pictures on the whole planet. In any case, when you have exceptionally crummy client care, then it will not do you right. The beneficial thing about well-altered photographs is that it's a venturing stone for your business to offer your clients the best support. At the point when you have incredible pictures and extraordinary client care, clients can rapidly tell you're seriously viewing your business. Clients Can Get Acquainted With You And Your Business Photograph altering can give your showroom a benefit by making your vehicle pictures look better and deals commendable. Nonetheless, the advantages of photograph altering for your vehicle sales center are not simply restricted to vehicles. Assuming you have an 'About Us' page on your site, odds are good that your staff's photographs are in there. You can upgrade your associate's profiles by altering their photographs to make them look more splendid and welcoming. Most clients couldn't imagine anything better than to know the individuals behind the business, so it's consistently urgent that you generally put one foot forward, even on the Internet. Photograph Editing Is Cost-Effective With regards to photographs for your vehicle sales center, you have three choices. You can either employ an expert picture taker, purchase cameras and gear or simply have the pictures altered. As indicated by Snappr, employing an expert auto photographic artist costs around $301 for an hour of shoot. Add three additional hours to that, and it will cost you $841. Simply envision the amount you will spend if it's days of work. Then again, buying a camera and other gear, for example, lighting installations and focal points can set you back much more. If you have any desire to have incredible vehicle photographs for your posting without consuming your pocket, then altering pictures can assist you with setting aside a ton of cash. You don't have to recruit a picture taker or buy gear. All you want is a decent camera telephone, your durable hands, and an altering application or two. The majority of these applications are not difficult to utilize, so you don't have to peruse a lot on essential photograph altering. Nonetheless, on the off chance that you have additional cash in excess or lack the opportunity and energy to alter, you can constantly employ a vehicle photograph manager who can deal with the pictures. Who needs a car image editing service? Car image editing service is mostly hired by car manufacturers, car retailers, car photographers, car reviewers, magazines, and other companies related to car supply. It is a vast business market and car image editing service plays a big part in the marketing sector of this business.  Land new clients and entrust them by protecting consistency with 7 fundamental (and pivotal) rehearses by your clipping organization. On the off chance that you are now engaged with the clipping path industry, you comprehend that nothing is significant in excess of a meeting with clients at the pitch. It is the main part of the venture and the best qualification between modest and bigger organizations in the video fabricating area. Despite the fact that your pitch is dependably the greatest part of the appearance of new clients, there are a few quite certain and useful things that all clients are searching for while checking out at video organizations. 1. Brand Reputation Prior to beginning, first, remember to have your potential clients previously found out about you? Do they have any idea about how incredible your business is and what great activities you are creating? On the off chance that the response is no, why? There are two techniques to fabricate a strong brand image. You, right off the bat, accomplish strong work for strong clients, taking care of business endlessly time again for quite a long time. Also, you emerge and illuminate people about your biggest and most refined drives in organizing, exposure, advertising, and shows. Look out for grant drives. Track down papers and commercials. Verbal exchange is consistently fabulous, however, you want to find however major areas of strength for many as important to get your name there to get your business forward. In the clipping path industry, just top-notch service talks clearly. 2. Comparable Work Continuously attempt to introduce a comparative sort of work before your possible client. It assists with understanding your capacity as well as lifts the certainty of your clients to give you the venture. For instance, on the off chance that your client's necessities are internet business photo altering, show them your past item photo altering works, and show them your work on web-based business items. Online commercial centers have a few limits in the image transferring segment for each item. Furnish them with the image prerequisites they need for their item image to be displayed in web-based commercial centers. Hence your client will have confidence in you and your work. 3. Genuine Team, Real People I can illuminate you, having collaborated expertly on the two sides of this area that the way that I am simply a genuine individual is of most extreme significance. Clients are searching for people with whom they can relate, fix issues and succeed. Consequently, it quickly turns out that in the event that a business simply distributes alters for subcontractors, you lose that genuine connection. 4. Strong Point of Contact Likewise, when a client pursues a venture — particularly where this is something beyond an oddball or multi-stage project — it needs to see definitively who your resource — is and where it arrives at each hour of the day. You can't draw certain lines. You should. Having standard organization hours is fundamental. Your clients will rest better at night and be prepared to return home all the more effectively in the event that they can give a genuine person, who can respond constantly with the right, state-of-the-art information and help. 5. Clear, Professional, and Upfront Finances I can illuminate you that working with organizations and clients, both enormous and little, is just the requirement for straightforward, brief, and direct front arrangements that will constantly remain something very similar. In the extensive-term, the two sides will benefit from this. Clients are generally mindful of straightforward and exact citations at the cost of an agreement. It is far better in the event that you can pay line-point expenses so clients can see exactly where and why their money goes. The last thing you believe that should do is make changes and thusly request more money. That is something clients detest. 6. Results-Driven Attitude On the off chance that clients contact clipping path organizations, they are not looking for a delivered mechanical thing. An imaginative partner or a showcasing specialist they are looking for. You can't just give a bigger thing, however, can likewise help them with their outcomes which will continuously procure you more credit from here on out in the event that you can contribute the Zeit to really work with your client to know their necessities and what the issue is the attempt to determine. 7. The Little Perks At long last, clients partake in the little stuff. The little motions a few clients guarantee they acquired from the consenting to of the arrangement would shock you. Whether somebody welcomes you with a grin, somewhat present, or a decent subsequent message at the entryway. It never neglects to exhibit to clients you esteem them and that their business infers something to you and your business. On the off chance that you are a novice in the image clipping path service industry, you need to focus on these tips at the present time. Ordinarily, clients of these services generally have tremendous undertakings. So assuming you neglect to give your clients that certainty for which they will give you the venture you will not have any undertaking sooner. Address your organization as respectful, able, and dependable to your clients so they get dazzled and give you the obligation. In any case, You need to define your organization's objective and furnish the quickest conveyance reaction with industry base costing clients who will undoubtedly give you their ventures.  What is image web optimization?
Image optimization is about reducing the file size of your images as much as possible, without sacrificing quality, so your page load times remain low. It's also about image SEO. That is, getting your product images and decorative images to rank on Google and other image search engines. Why optimize images? When you optimize images for the web, you're reducing page load time and increasing site speed. Even if it's just a few milliseconds, that could be the difference between your site either gaining or losing countless website visitors. And you need those visitors so you can increase web leads. When you click a link to visit a website, the server calls all of the files for the site to load on your screen. Depending on how your site is built, the images could account for the majority of the data that needs to be loaded. Because it can be such a major portion of what's loading (and what's slowing the site down), optimizing images for the web is one of the first things we do when we work with a client to improve site speed. The smaller the file sizes of the images, the faster a website loads. Improved website speed- It can increase your website load speed by a lot and ensure more visitor interactions. Better browsing experience- Webpage load speed is very important for visitors’ experience. Every second of delay in load time can make 10% of users leave the website. If a page has a longer load time, then then the bounce rate will be high and the average time on the page will be below. So to ensure better browsing experience image optimization is key. Improved search performance- If a website has optimized images then, both search engines and visitors could understand the website and its content better. It can help rank your images in Google’s image searches. Tips Use concise and direct image names- Make sure you have simple and precise names for your images. It helps both visitors and search engines to understand the context. Optimize your alt attributes carefully- If the browser can’t render images correctly then they show texts instead which explain what the image is really about. So make sure you have the right and exact alt attributes explaining your image. Resize your images- As you know by now website load speed affects a lot of things like your website ranking and visitor satisfaction and average visit times etc. So resizing your image can make the website load time a lot. Choose the right image format- Choose an image format that suits your website best. There are many formats like JPG, PNG, GIF, Webp, etc. They each have pros and cons so choose carefully. Optimize your thumbnails- Be very careful about your image thumbnails as they also contribute to your webpage load speed. You can also make quality a little bit low to make sure they load faster. You can check for photoshop web image optimization service for the best photo optimization services for your product photos. Produced by Clipping Path House Graphics Media.  What does clipping path mean?
A clipping path is a path a video or image takes when it is placed on a 3D object. The shape, size, and position of the clipping path are defined by the 3D object with which it shares a frame. Most video editing applications allow users to define the shape, size, and position of the clipping path of the video or image they are editing. A clipping path service is a video editing service that allows users to define their own clipping path. What is a clipping path? A clipping path is a path a video or image takes when it is placed on a 3D object. The shape, size, and position of the clipping path are defined by the 3D object with which it shares a frame. When to use clipping path? Clipping path is a useful tool in video editing for removing unwanted background or foreground objects from a scene. Background or foreground objects are objects that lie outside the 3D volume of the video or image. Most video editing applications allow users to define the shape, size, and position of the clipping path of the video or image they are editing. A clipping path service is a video editing service that allows users to define their own clipping path. What are point clipping and line clipping? Point clipping is the process of removing unwanted objects and objects with a certain color from a video. Line clipping is the process of removing unwanted objects and objects with a certain color from the video. Why do we need clipping? The significant advantage of using a clipping path is that it enables users to define the shape, size, and position of the 3D objects with which they wish the video or image to share a frame. A clipping path service is a video editing service that allows users to define their own clipping path. Clipping path service enables users to remove unwanted objects and objects with a certain color from a scene. Clipping path service is also a helpful tool for removing background or foreground objects from a video. Why do we use a clipping path? A clipping path is a path a video or image takes when it is placed on a 3D object. The shape, size, and position of the clipping path are defined by the 3D object with which it shares a frame. By and by, clipping path service has been popular because of the rising number of online organizations, promotions of various items to make it look interesting to the client's eyes. The clipping path helps cause to notice the items shown on the site, giving the purchaser an inclination to buy the item. Huge organizations like Amazon, eBay, Walmart, and other online business organizations, depend exceptionally on clipping path services for their item images. Clipping path services are popular for various businesses. A large portion of the ventures incorporate the style business, electronic organizations, toy organizations, adornments organizations, showcasing organizations, engineering, and inside plan organizations. Aside from them, clipping paths hold a more exhaustive scope of reasons and purposes to serve. For instance, clipping paths use in visual communication, web image improvement, pennant planning, and other work. Each planning master requirements to make a clipping path for their work as it is a piece of their everyday work. Disconnecting specific pieces of an image, eliminating foundation, and clipping paths are broadly used for various purposes. It is a fundamental piece of planning, and consequently, doing the occupation as an expert is an insightful choice. The clipping path should be precise to do right by your image, and thusly, specialists are the main decision suggested. Photoshop clipping path tutorial How to create a clipping path in Photoshop? Here are the steps on how to create a clipping path in photoshop. Step 1: Upload your Image after launching Adobe Photoshop After you successfully open photoshop, go to File > Open. Browse through your photos and upload the image that you want to edit. Step 2: From the main toolbar, select the pen tool Go to the main toolbar on the left, as shown in the image below, and select the pen tool. Accuratting results from a pen tool, a good amount of practice is required. Step 3: Select a new path For creating clipping of the image, select a new path as shown in the image below. If you cannot find the path option automatically, you can select the path from the windows from the above menu. Step 4: Start to draw the exact shape of the image that you have uploaded Step 5: Draw a clipping path around your product Make sure that the path is accurately clipped, and spending on the object’s shape time to draw a clipping path might vary. Step 6: Use ‘Ctrl + Enter’ for selection For selecting the clipping path that you have created, use the shortcut ‘Ctrl + Enter‘ Step 7: Use ‘Select > Modify > Feather’ or ‘Shift+F6’ for smoothness Apply 0.5 feathers for smoother edges. Go to ‘select from the above menu, then ‘modify,’ and then select ‘feather.’ You can also use the shortcut Shift + F6. Step 8: Make a copy of the background layer and mask the copy layer. Select a solid color layer in the medial position. Step 9: Done! You have successfully created a clipping path for your image. Please note that you can use any color of your choice as your requirement. Why is my clipping path inverted? Presently, while chipping away at the clipping path, many individuals encountered an issue and searched for an answer for the issue of "for what reason is my clipping path inverted." Presently the inquiry is, the way you can tackle this issue. Making sense of The Problem: I open a photo in photoshop and I make a clipping path around the subject. Be that as it may, when I make a choice by squeezing Shift+Ctrl+D, generally my choice is modified/switched. Taking care of Clipping Path Inverted Problem Easily: To dispose of this issue click on the Select option and pick Inverse from the dropdown menu. You additionally can take care of this issue by using alternate routes. To do this Press the Shift+Ctrl+I button from the console. Check the image out. Presently the determination impeccably covers just the subject. Presently press the Q button from the console to see the outcome. Done! I trust it takes care of the issue. How to save clipping path in Photoshop? Click on the triangle-formed symbol situated at the upper right corner of the board, and afterward pick "Save Path". Then, select "Clipping Path" from a similar drop-down menu. Another exchange box will show up with an assortment of clipping path settings. Ensure your path is chosen, and afterward, click OK. That should save your path and solve your problem. How to create a clipping path in illustrator? There are four distinct ways of making a clipping mask. Remember that in all techniques, the clipping path should be on top of the item you wish to cut. For instance, I need to show just the headshot of this image. Step 1: Create a clipping path. I used the pen instrument to make this path. Step 2: Place it on top of the item you wish to cut. You can likewise fill the path with shading to see plainly where the path is. Because at times when you deselect the path, seeing the outline's hard. Step 3: Select both the clipping path and the item. Step 4: You have four choices. You can make a clipping mask using the alternate way, right-click, from the upward menu or in the Layer board. How to remove clipping path in illustrator? Delete the Clipping Path: With one of the <Clipping Path> layers highlighted and the blue box selected, delete the clipping path by pressing the Backspace button, the Delete button, or by clicking the Trash Can icon at the bottom of the Layers panel. Clipping path vs clipping mask Clipping path and clipping mask are two similar but different tools that are used in video editing applications to remove unwanted background or foreground objects from a scene. The main difference between clipping path and clipping mask is that clipping path is a service that is used in video editing applications to remove unwanted background or foreground objects from a scene, while clipping mask is a tool that is used in Adobe Photoshop to hide or reveal part of the image or shape of an image. To understand the difference between clipping path and clipping mask, see the following examples. Benefits of clipping path and retouching for photographers It is the best strategy for eliminating a background from any image. Indeed, there are various other simpler techniques for accomplishing similar outcomes. These are alluded to as enchantment devices and this is because it is a single tick undertaking. You can eliminate the background in just two mouse clicks. For an ideal impact, the image first requires to have an even shape and a positive tone. In the event that a subject photograph contains various shadings and lopsided background, these handy solutions won't be viable and that is the sole motivation behind why experts use a Photoshop clipping path. It is exact and takes care of business. It is the ideal apparatus for fragile images. Assuming you know about eliminating a background from an image that contains hair then you realize how hard accomplishing wonderful outcomes is. The state of hair makes it very difficult to eliminate the background from that area without influencing the hair. In the event that you recruit an image editing service, they will use the Photoshop clipping path to handily move around the hair and eliminate the background impeccably. It sets aside time and in this way cash. Experts comprehend that is a tedious assignment to use programmed background expulsion apparatuses. This is because the subsequent image will be awful and afterward amending it will be more regrettable. It is smarter to errand to a clipping path service, to guarantee the best nature of work. The time you might have used to self-alter numerous images can be moved to other lucrative assignments. It is the background of eCommerce business. Online stores rely upon item photographs and recordings to draw in clients. An image is the nearest a potential client will get to an item that is sold abroad for instance. Clients are exceptionally picky; they need an incredible item photograph without any imperfections and of a high goal. On the off chance that a business needs to manage a few thousand item photographs, it becomes monotonous to guarantee that they are all in amazing condition. To make work more straightforward, a photographer's work will be to take as numerous photos as they can, then these are shipped off to an image editing service. Here a Photoshop clipping path is applied to them. Using a clipping path service is the most productive method for handling images. Some other endeavors of going the alternate way course will bring about catastrophe. I hope this guide has helped you learn everything there is about the clipping path and I hope you would check out our future blogs. 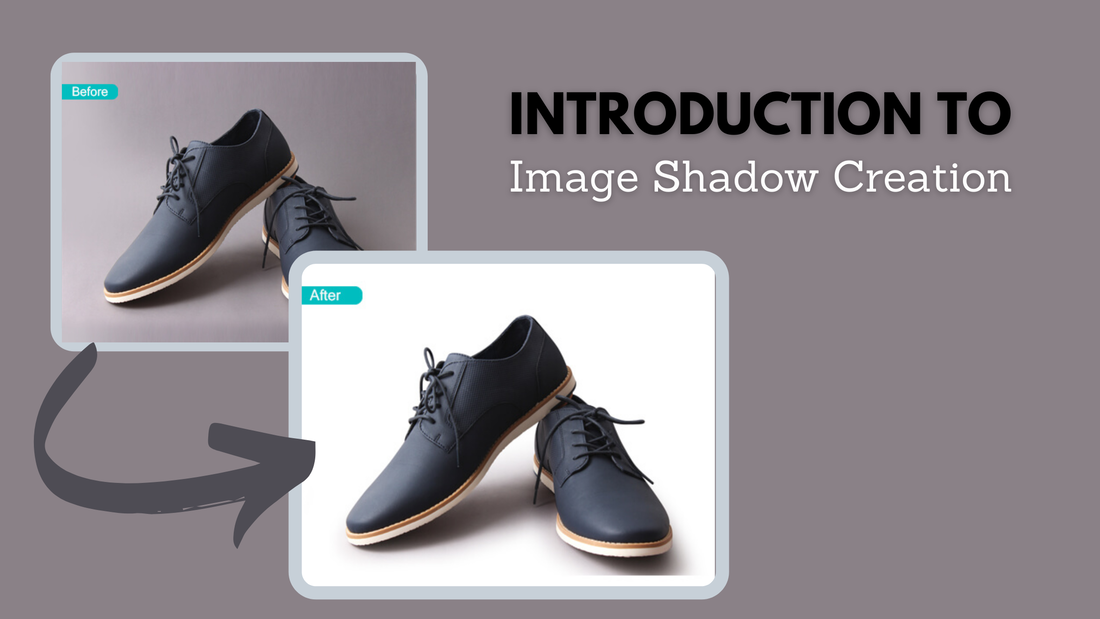 What is shadow creation?
Shadows are something that is essential for our day to day existence. On the off chance that there is light there is shadow. Shadows make anything in light total. It would be abnormal to see somebody remaining in light with next to no sort of shadow. Shadows assist us with getting a picture. There are times when there are no noticeable shadows in a picture or perhaps it was clipped from another background and it needs a shadow to look great. Editors then, at that point, utilizing a product makes a shadow of that individual/thing/item. Shadow creation is a high level degree of picture altering expertise. Photoshop picture shadow creation administration is given by many picture altering organizations on the planet. Why use it? Shadows are an extraordinary method for rolling out incredible improvements to subtleties in a picture. It can go about as a blocker and separate the picture into two unmistakable regions, light and dim part. Shadows can add differentiation to a picture so it looks vivid. It can add aspect to something. Shadows can likewise add organization and a feeling of equilibrium to a picture. Shadows are an incredible method for making a picture more nitty gritty and strong. so in the event that you request that what programming use to add or eliminate shadows it ought to be self-evident. Photoshop makes it much simple to make or eliminate shadows from any sort of picture. It is totally important to have some sort of shadow with the goal that it is more practical and looks great to any sort of individuals glancing through their screen. Photoshop image shadow creation service can also help you attract clients from all around the world to your website. Tips! However it is a difficult to dominate expertise yet with a few practice and difficult work anybody can make it happen. Here are a few hints to support your work, Try not to Use Defaults In any sort of planning programming like (Photoshop, Figma, Sketch, and so forth) default shadows are bad. Those make pictures look awful. So involving them in any sort of picture is certifiably not a smart thought. Make it Look Soft Try not to use hard shadows on the off chance that you can't help them. Delicate shadows are incomprehensibly used and they look great on anything. In the event that you want to try it out, attempt and lessen the darkness by 10-30% and obscure it up by 15-40 pixels. This is a simple method for making it happen however there are other strong ways of getting it done. Keep away from Pure Black Normal shadow isn't unadulterated dark in shading. So to make it look regular you want to ensure you are utilizing a dim shading rather than unadulterated dark tone. Get a glance at the environmental factors or components and select a dim shading in light of that. Along these lines, it will be sensible and great to check out. Use a Separate Layer as a Shadow Carrying out standard shadows is effortless. However, for a more embellishing reason, you can copy and place it behind the component. This method will give you more control of the shadow. Get Inspired from Surroundings Shadows are something genuine and to make one inside a PC you want to check your environmental elements out. Take motivation from them and attempt to see how really a shadow looks. Then, at that point, print that to you and attempt to reproduce it inside a PC. This blog was produced by Clipping Path House Graphics Media.  How to Set Up a Product Photo Studio on a Budget
Today the photography marketplace has become much more competitive and many photographers are trying to reach out to their clients for projects. The market has become much harsh and customers are only choosing the best photographers. For that reason, new photographers are struggling. Today we are going to talk about how new photographers can get budget equipment for their professional photographer. Here are the five main pieces of equipment you can get on a budget-
In conclusion, a photo looks good or unique depending on the photographer’s imagination. Practice your craft and get these five main equipment to give you a boost on your professional product photography. |
How to create Ghost Mannequin effect in photoshop cc
How To Create a Clipping Path and Remove Background
|
 RSS Feed
